There’s no doubting the fact that Skype is the most amazing VoIP
services around. Hundreds of millions of people use it everyday, and
it’s supported by almost all mobile and desktop platforms. But just like
many top notch tech solutions, Skype isn’t without its shortcomings. If
you use Skype on Windows, you’d probably be aware that it doesn’t let
you remove the chat history of a single contact only and the only
(official) way is to delete it is by clearing the entire chat history
from Preferences. You’re not completely out of luck though, as there is a
way to delete Skype conversation of one user if you want. And in this
guide we will show you how. So without any further ado, let’s get
straight to it.
Skype basically stores all the text chats with contacts in the SQL database file called “main.db” which is stored inside the Roaming folder of Windows. This database file in fact also carries other information related to settings and options stored by the user. Fortunately, there’s a way to access this information via an open source tool called SQLite. Using this tool you can access the main database file and remove any non-required data entries.
First off download SQLite Database Browser from sqlitebrowser and extract the contents of the ZIP archive to an easily accessible location. SQLite is a portable tool which means it runs without any installation.
Launch the program and navigate to ‘Open Database’ from ‘File’ menu as demonstrated in the screenshot below.

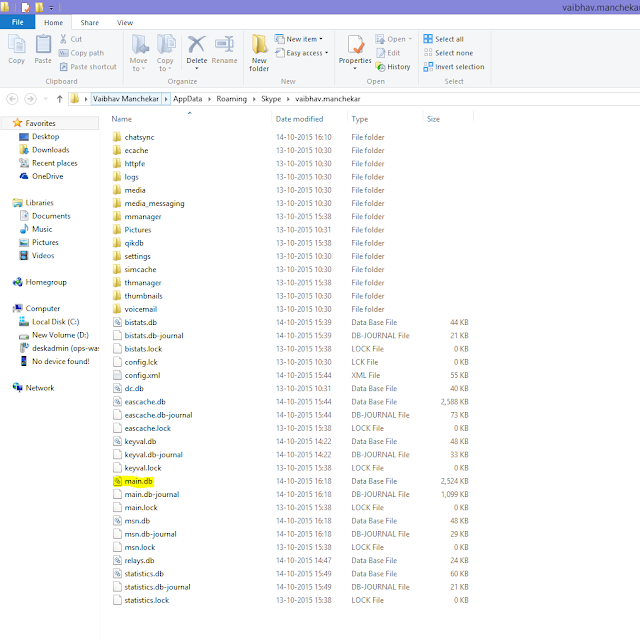
Now you need to browse to the ‘main.db’ database file that I mentioned earlier. Navigate to the following directory:
C:\Users\’windows_username’\AppData\Roaming\Skype\’skype_username’\
Select ‘main’db’ from the available files and click ‘Open’.

Within SQLite program, click ‘Browse Data’ tab, and under Table drop down menu click ‘Conversation’.

This will open the conversation data entries stored within the
database pertaining to each user ID in your Skype contacts. This allows
you to easily find the conversation you need to remove by identifying
the user ID.
To delete an entry, all you need to do is click its related row followed by clicking ‘Delete Record’ at the top right. You can highlight and delete multiple records in a similar way. After deleting non-required entries, click Save on the toolbar and close SQLite.

Skype basically stores all the text chats with contacts in the SQL database file called “main.db” which is stored inside the Roaming folder of Windows. This database file in fact also carries other information related to settings and options stored by the user. Fortunately, there’s a way to access this information via an open source tool called SQLite. Using this tool you can access the main database file and remove any non-required data entries.
Warning: Make sure to backup the “main.db” file before implementing the steps mentioned below. This file is located under C:\Users\’Windows_username’\AppData\Roaming\Skype\’skype_username’\

First off download SQLite Database Browser from sqlitebrowser and extract the contents of the ZIP archive to an easily accessible location. SQLite is a portable tool which means it runs without any installation.
Launch the program and navigate to ‘Open Database’ from ‘File’ menu as demonstrated in the screenshot below.
Now you need to browse to the ‘main.db’ database file that I mentioned earlier. Navigate to the following directory:
C:\Users\’windows_username’\AppData\Roaming\Skype\’skype_username’\
Select ‘main’db’ from the available files and click ‘Open’.
Within SQLite program, click ‘Browse Data’ tab, and under Table drop down menu click ‘Conversation’.
To delete an entry, all you need to do is click its related row followed by clicking ‘Delete Record’ at the top right. You can highlight and delete multiple records in a similar way. After deleting non-required entries, click Save on the toolbar and close SQLite.
It may sound like a lot of work but this is the only working way of
deleting Skype conversation of a single contact. It should be noted that
this method will only delete conversation history from your computer
and not from the recipient’s system.
Comments
Post a Comment